Jan 25, 2021
.jpg)
Instagram’s rolling out new features left and right like their introduction of Reels in August. But Instagram Guides is something new and different and, dare we say, useful for content creators like ourselves. And while Instagram Guides is still in its infancy, with that comes so much untapped potential that we really can’t wait to discover the more people begin using this tool.
Instagram Guides debuted back in May 2020 as the Facebook-owned platform focused mainly on wellness content to help alleviate pandemic induced stress. They partnered with organizations like the American Foundation for Suicide Prevention and Headspace Australia who offered tips to managing anxiety, grief, and connection during this wild ride of a year.
Guides are accessible through the Instagram Explore Page and on an account’s profile. And just in time for 2021 content strategy goals, Instagram is offering its Guides feature to every account to use and make their own.
There are three types of categories your Guides can fall under – places, products, and posts. All three of these guides are meant for every type of creator and are completely customizable and adaptable to your needs.
Whatever business industry you’re in, content creation is key to marketing your business online. Because Instagram Guides functions like a mini-blog on your Instagram account, it’s perfect for storytelling and being a resource center for your followers and customers. It’s a space to group key content together by category.
This is perfect for your followers looking for one of your previous posts or products you’ve recommended in a gift guide. Here are a few ways to use Guides to help grow and promote your business on Instagram:
Showcase Your Expertise - Here’s your opportunity to share with your followers who you are and what you care about. Use this feature to explore topics and themes that ignite your passion and show your authentic self to your audience. This not only will build brand loyalty but trust as well.
Recommend Your Top Products - As a business owner or someone with influence on Instagram, Guides is the perfect tool for highlighting the products and services you offer or the brands with your most-used products. You can use Guides to write custom headlines detailing insightful how-to’s, best practices, and insider hacks for products & services.
Curate a List of Top Posts & Saves - Your best performing content now has a place to live on your Instagram. By adding your top posts and saves to a Guide, you’re giving your followers a place to reference educational content or the posts that help visualize and tell your personal story.
Support Your Peers - Be an advocate for those who share your space and use Guides to highlight the small businesses and creators you love.
.jpeg)
Now that you know a few different ways to use Instagram Guides, making them will be easy and fun to do!
The user-friendly approach will have you setting up your Guide within seconds. And before you know it, you will be editing and adding to your Guides so it aesthetically represents your brand in the best way. Let’s get started!
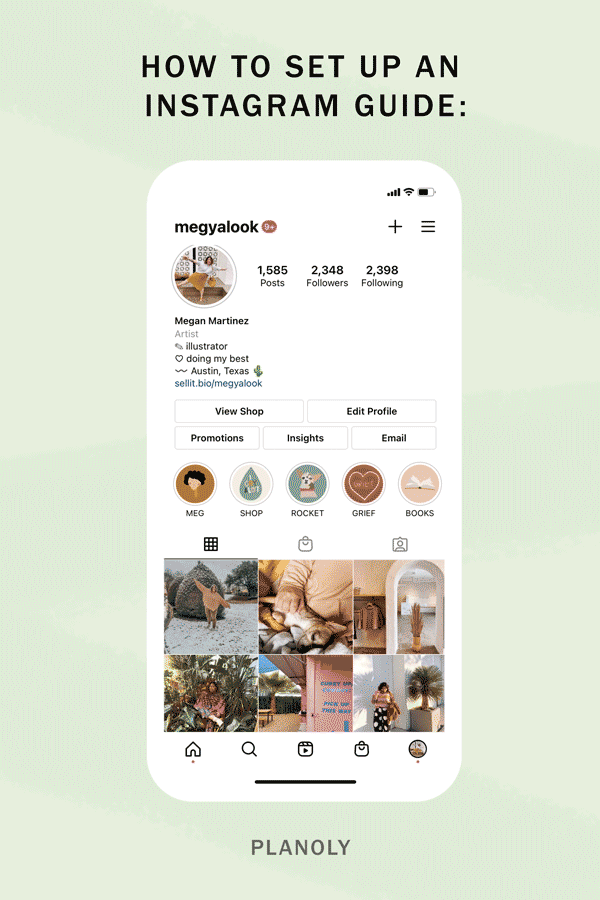
Step 1: Go to your Instagram Profile page, tap the “+” icon on the top right of your screen then tap “Guide” on the menu.
Step 2: From there you will have three options to choose from. Each Guide type is designed for every type of creator. Whether you’re a business owner, influencer, or both, you’ll be recommending products, cities, and content to your followers in no time!
Step 3: After you select your Guide type you can start choosing what to add to your Guide. In the example above, we chose the Posts Guide type where we added a few of our favorite posts from MegYaLooks Instagram. You can add your own title and caption to give further context to your readers.
Step 4: Once you add your title, select your Cover Photo, and captions for each post included in the Guide, you are ready to publish. Click “Next” in the top right corner of your screen and then tap “Share.”
Step 5: Once you tap “Share” your Guide is public to your followers. To access your Guides your followers will click the “Guide” icon on your Instagram’s profile page.
After you’ve created your set of Guides, you can always go back and edit to accommodate the way your business or brand evolves. You can remove old products, update evergreen content, and more!
Once you create your Instagram Guide or Guides, you’re going to want to check out other creators’ Guides too. All Guides are accessible through the user’s profile page or through the Instagram Explore Page.
Checking out other Guides is great for finding inspiration or finding accounts to partner with and include in your Instagram Guides. For example, if you’re creating a Gift Guide using the Products Guide type you can recommend and link out to their website or account.
Now, that you know all the possibilities of Instagram Guides, get started with this game-changing feature for telling your brand’s story and selling products online. Check out our Instagram Guide full of our best posts to get started on Instagram Marketing.
.svg)
Enjoyed reading it? Spread the word


